ThinkPad W520: My (old) new computer
My home computer is a tricked-out 2011 ThinkPad W520. I find it to still be very fast and a joy to use. This post describes upgrades I’ve made to keep the machine relevant in 2018.
I got the W520 as my main work laptop in late 2011. In fact, you can see it in this 2012 AppHarbor housewarming invitation connected to two 23″ portrait-mode monitors. I spec’ed it with a quad-core/8-thread i7-2820QM 2.3/3.4GHz 8MB L3 processor, 8GB RAM, and two 320GB spinning disks configured for RAID 0 (You had to order with a RAID setup to get that option, and 320GB disks was the cheapest way to do that).
After taking delivery I switched out the disk drives for two 120GB Patriot Wildfire SSDs, also in RAID 0. The result was a 1GB/s read-write disk array which was good for 2011. At some later point I upgraded to 32GB RAM (4x8GB)—memory was much cheaper back then. I also added a cheap 120GB mSATA SSD for scratch storage (the mSATA slot is SATAII, so somewhat slower).
After leaving AppHarbor I used the W520 only sporadically for testing Windows Server pre-releases and running test VMs. Whenever I did, though, I found myself thinking “oh year, this is a really neat and fast machine, I should use it for something”. In 2017 I moved into condo and got to have a home office after 7 years of moving between assorted shared San Francisco houses and apartments. For my home PC, I wanted to see if I could make the W520 work.
My main requirement was a system that can power a 4K monitor running at 60hz. The W520 has a reasonably fast Nvidia discreet GPU and can render 4K just fine using remote desktop, but neither the VGA port nor the DisplayPort on the laptop can push out that many pixels to a plugged-in monitor.
Luckily the W520 has a bunch of expansion options that can potentially host a more modern graphics adapter:
- 2xUSB 3.0 ports
- Internal mini-PCIe slot used for WiFi adapter (the Lenovo BIOS whitelists approved devices however, so a hacked BIOS is required to plug in anything fun)
- ExpressCard 2.0 slot
ExpressCard technology was on the way out in 2011 but had reached its zenith and in the W520 offers a direct interface to the system PCI Express bus. This avoids the overhead and extra latency of the USB protocol. An “eGPU” ExpressCard to PCIe adapter is required to plug in a real graphics card and I got the $50 EXP GDC.
I settled on a Nvidia GTX 1050ti graphics card since it’s reasonably fast and power efficient. Note that a 220W Dell power brick is also required to power the PCIe dock and graphics card.
UPDATE: This script from a user on the eGPU.io forums fixed the “Error 43” incompatibility for me.
Recent Nvidia driver versions have introduced an incompatibility with eGPU setups and I spent some time troubleshooting “Error 43” before getting output on the external screen. I never got recent drivers to work, but version 375.70 from 2016 is stable for me—implausibly since it predates and is not supposed to support the 1050-series GPU. The old driver has proven to be a problem only when trying to play very recent games, and is not a blocker (but do get in touch if you happen to have gotten a setup like this working with the latest Nvidia drivers). I also tried a Radeon RX 560. While it didn’t require old drivers to work, it had all sorts of other display-artifact problems that I didn’t feel like troubleshooting.
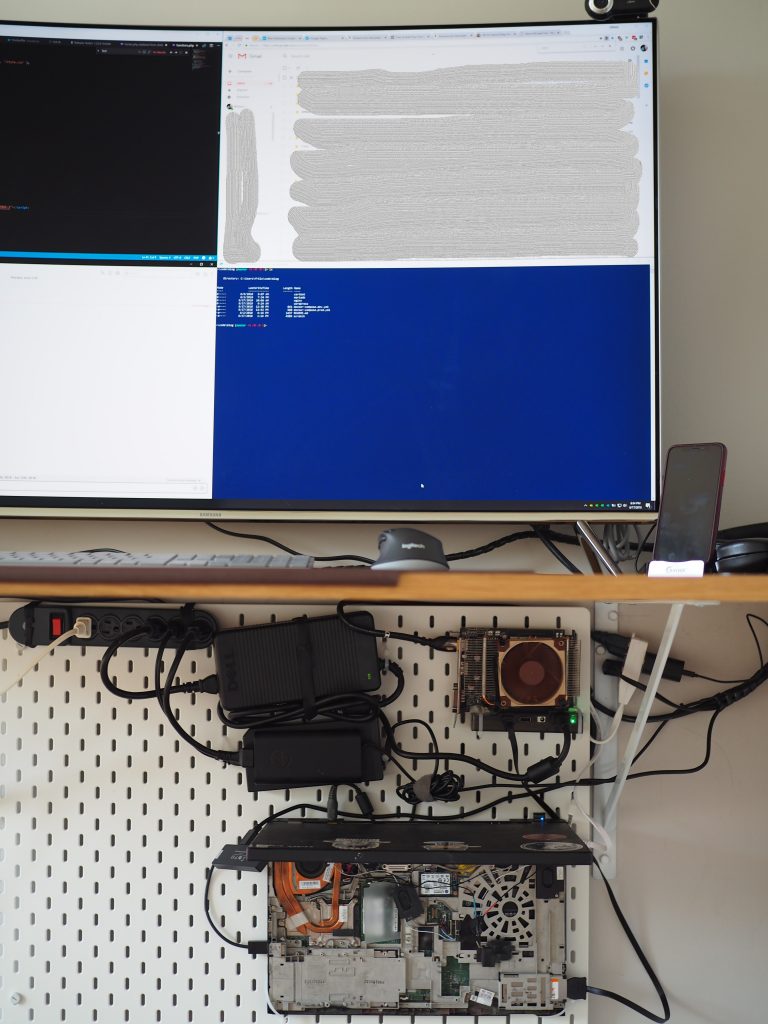
The standard ZOTAC fans are loud and I replaced them with a single 80mm Noctua fan mounted with zip-ties. The fan connector is not the right one but can be jammed onto the graphics card fan header and wedged under the cooler. I removed the W520 keyboard and zip-tied another USB powered 92mm fan to the CPU cooler so that the (louder) built-in fan doesn’t have to spin up as frequently (not in picture below).
The final upgrade was two 512GB Samsung Evo 860 SSDs that replaced the old 120GB Patriot ones to get me 1TB of local storage.

The whole assemblage (gutted laptop festooned with adapters, the PCIe dock with graphics card, power bricks) is mounted on the wall under my desk. After much experimentation the components are now zip-tied to an IKEA SKÅDIS pegboard. The pegboard comes with stand-off wall mounts which allows some of the many cables to run behind the board. I put a small fridge magnet on the screen bezel where the “lid closed” sensor sits to keep the built-in LCD screen off.
I’m still very happy with the W520, and while I’m not sure getting the eGPU setup working was economical in terms of time invested (over just buying parts for a proper desktop), it was a fun project. To my amazement, it merrily runs slightly dated games like XCOM 2 and Homeworld 2 Remastered in full, glorious 4K.
Lenovo still supports the platform and recently released BIOS updates to address the Meltdown/Spectre exploits.
With the RAID 0 SSD disk system, the quad-core W520 still feels deadly fast and is a joy to use. It boots instantaneously and restoring a Chrome session with stupid many tabs (something I’m bad about) is quick. With 32GB of RAM I can run Docker for Windows and a handful of VMs without worry.
Leave a Reply